
A Step-by-Step Guide to Leather Production
Leather is a versatile and durable material used in a wide range of products, from bags and shoes to furniture and clothing. The process of making leather involves several precise and technical stages, each contributing to the final product’s quality, durability, and appearance. Here’s a breakdown of how leather is made, from raw hide to finished leather goods.
1. Raw Material: The Starting Point
Leather is typically made from the hide of animals, with cowhide being the most common choice. Other hides like those from pigs, sheep, goats, and even crocodiles can also be used, but cowhide is the preferred option for most leather products.
The process begins after the animal’s hide is removed. This is a by-product of the meat and dairy industries, so using the hide to make leather ensures that it is not wasted. A good-quality hide is crucial for producing leather that is long-lasting. For example, cattle that have been exposed to things like barbed wire or electric cattle prods can have damaged hides, leading to poorer leather quality.
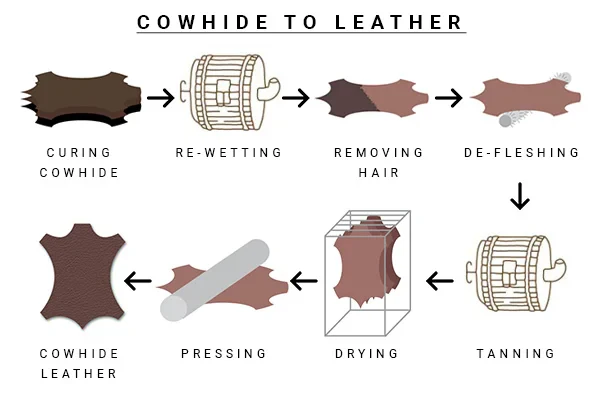
Once the hide is removed, the fleshing process begins, where any remaining flesh is scraped off, either by hand or using a fleshing machine. Afterward, the hide is thoroughly cleaned and salted or placed in a brine solution to prevent decomposition.
For hides with hair, a lime bath (a chemical solution) is used to remove the hair and soften the leather, which may take up to two days. The hide is then soaked, and it swells to about 4mm thick, making it ready for splitting into layers.
2. Tanning: Preserving the Hide
The next step is tanning, a process that preserves the hide and prevents it from decaying. Hides are placed in a large drum along with tanning agents, which can either be vegetable-based (from tree barks) or chromium salts. Vegetable tanning creates a flexible leather, ideal for items like luggage and furniture, while chromium salts create a stretchier leather, often used for clothing and handbags. Sometimes, both types of tanning agents are combined for a balanced leather with the best of both worlds.
After tanning, the hide is treated with fats in a process called liquoring, which helps to enhance its strength and softness. The excess moisture is removed by applying high pressure through rollers, and the hides are then inspected and graded based on quality. The better-quality hides will be used for high-end leather products like bags and jackets, while those with imperfections might be used for more affordable items.
3. Re-Tanning: Refining the Leather
To achieve the perfect finish, leather often goes through a re-tanning process. This additional step involves repeating the tanning process to further improve the leather’s qualities. After re-tanning, the leather is dried. Depending on the method, the hide can either be air-dried or vacuum-dried. Vacuum drying is faster but can cause the hide to shrink slightly, leaving it with a smooth, tight texture.
During this stage, bleaching agents may be used to prepare the leather for dyeing.
4. Dyeing: Adding Color
Leather dyeing is where the magic of color happens. The dyeing process can be lengthy, as it requires the hide to be soaked in dye for several hours (usually about 8 hours) to ensure the color is fully absorbed. Leather can be dyed in a wide range of colors, from traditional browns and blacks to vibrant, bold hues.
After dyeing, the leather is rinsed thoroughly to remove excess dye and chemicals, ensuring the color is even and that no unwanted residue remains. The hide is then dried completely to set the color.
5. Finishing: The Final Touch
The last step in the leather-making process is finishing. This stage ensures that the leather is supple, flexible, and has the glossy appearance that many people love. To achieve this, leather is stretched and natural oils are applied to lubricate the fibers. This not only softens the leather but also tightens its pore structure, giving it a smooth, desirable finish.
Different finishing techniques can be used to achieve various effects. For example:
Acrylic coatings can give leather a shiny, patent finish.
Mother of pearl can be used to create a pearlescent effect.
Leather can also be embossed with patterns for a unique look.
Once the leather is finished, it may go through an oven to cure the finishing spray. After curing, the leather is carefully stacked to avoid creases and imperfections before being sent off for use in products like bags, shoes, and furniture.
Final Quality Check
Before the leather is ready for production, it undergoes a quality control check. This ensures that the color is even, the texture is smooth, and there are no flaws such as tears or scratches. Only after this rigorous inspection can the leather be rolled and shipped for use in making high-quality leather products.
Conclusion
The process of making leather is both an art and a science, with each step carefully designed to transform a raw animal hide into a beautiful, durable material. From tanning to dyeing and finishing, every stage of production contributes to the leather’s final quality and appearance. Whether you’re purchasing a leather bag, jacket, or any other item, you can appreciate the craftsmanship and care that goes into each piece of leather.